
Hyper-V: How to Enable and Install Hyper-V on Windows 10


Before you start reading this guide, I want to clear – This is a complete guide. You won’t need any other tutorial as I have provided the best practical steps, which you need to follow. Queries/Topics covered in this Tutorial:
- How to Enable Hyper-V on Windows 10
- How to Setup Hyper-V on Windows 10
- How to Install Hyper-V on Windows 10
With the release of Windows Server 2008, Microsoft’s Network OS additionally provided its initial virtualization utility referred to as Hyper-V.
Microsoft isn’t VM technology because it had antecedently provided solutions like Virtual computer and Virtual Server. The Company developed more solutions and later integrated it with the Windows platform.
Along with the release of Windows 8 in the year 2012, Microsoft made Hyper-V accessible to the Windows client for the very first time, eschewing its previous consumer-oriented efforts for an additional strong solution.
In this tutorial, I’ll teach you How to Enable and Install Hyper-V on Windows 10.
Create VM Using Inbuilt Technology Windows 10 Hyper-V
Let’s take a glance at setting up Virtual Machine using the inbuilt Hyper-V technology. The advantages of using it are it enables the user to run multiple operating systems at the same time as long as you have got enough hardware resources.
I’m using it, as I need to test my PC’s compatibility. Hyper-V is also an excellent & free way to try and test apps, software, etc before using them on your primary Windows. Before getting started, make sure you have these requirements.
Pre-requisites to install Hyper-V on Windows 10
- 64-bit edition of Windows 10 Pro, Windows 10 Enterprise or Education. Hyper-V technology isn’t available in Windows 10 Home Edition
- Minimum of 4 GB memory. As virtual machines share the memory with the Hyper-V host, you will need to provide enough memory (minimum 4 GB) to handle the expected virtual workload.
- SLAT must be available. To Install Hyper-V on Windows 10 requires Second Level Address Translation (SLAT) — which is present in the current generation of 64-bit processors by Intel and AMD.
- Virtualization must be enabled in your computer’s Bios or Firmware
- Hardware Enforced Data Execution Prevention must be Enabled.
I assume that your pc has all the above-mentioned requirements. If you have Windows 10 Home edition, it can be upgraded to Windows 10 Pro.
To do so open up Settings > Update and Security > Activation. You can visit the Microsoft store and purchase an upgrade.
First, you need to verify whether you have Virtualization enabled & also the Data Execution Prevention available on your pc.
Also Read: 21+ Awesome Windows 10 Tips and Tricks
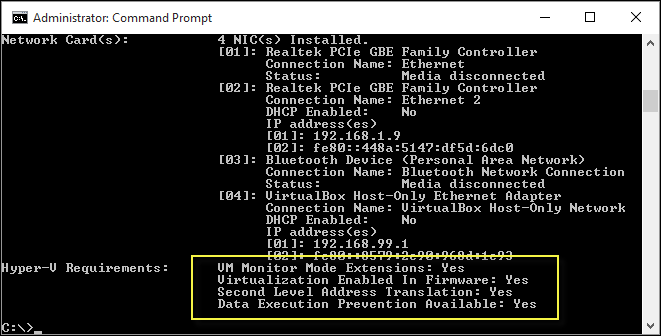
Verify All Hardware Compatibility
To verify compatibility, open up PowerShell or a command prompt (cmd.exe) and type system info. If all listed Hyper-V requirements have a value of Yes, your system can run the Hyper-V role.
Enable Virtualization to Run Hyper-V on Windows 10
Restart your computer and enter BIOS setup (usually by hitting F2, F10 or F12 key) on your keyboard before the computer loads your Windows OS.
This process varies according to the brand, so consult your computer’s manual for instructions on how to load the BIOS. I know, most of the computers get access to BIOS setup by hitting F2, F10, F12, DELETE Button.
For me, I have to hit the F2 key to enter BIOS Setup. Now follow the steps:
- If asked, Select language then Go to Security or System Security
- Search virtualization setting and enable Virtualization Technology (VTx)
- Save the BIOS Setting (usually F10, you can find keys on the bottom right of your screen
- Once saved, power of the computer, have a coffee and then start your pc
Enable Hyper-V on Windows 10
Follow these steps to Enable Hyper-V on Windows 10 Pc
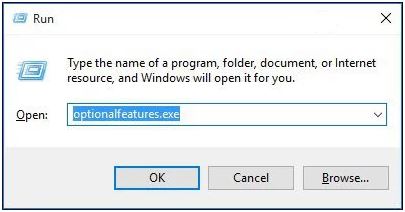
Go to Control Panel → Programs → Turn Windows features on or off. You can use alternate method i.e Press Windows key+R and type: optionalfeatures.exe & hit Enter. Both methods will take you to the Windows Features service.
Once it loads up, select the Hyper-V option and also make sure that all components under this option are also selected. Refer to the image below.

Note: After completing the above steps, click on OK, then wait while Windows installs and configures Hyper-V.
You will be prompted to restart to confirm changes. Windows will go through a series of restarts and configure your system.
Launch Hyper-V Manager
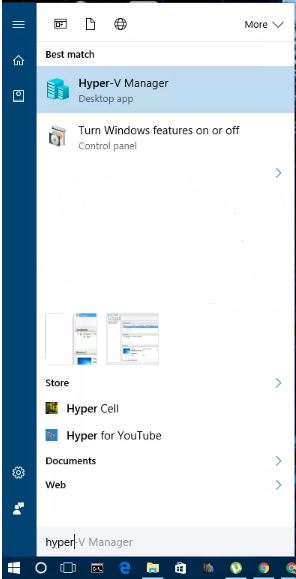
After Rebooting your computer, head over to search box and type hyper-v. In the search results, you’ll find Hyper-V Manager, click to Expand it. You can also find this option in Control panel > Administrative Tool > Hyper-V Manager.
Steps to Follow
The first thing you need to do after you enabled the Hyper-V feature is to create a network switch. You will need one to create and run virtual machines.
Open Hyper-V Manager, right-click the host, and choose Virtual Switch Manager. You can also find it on the Actions panel as well.
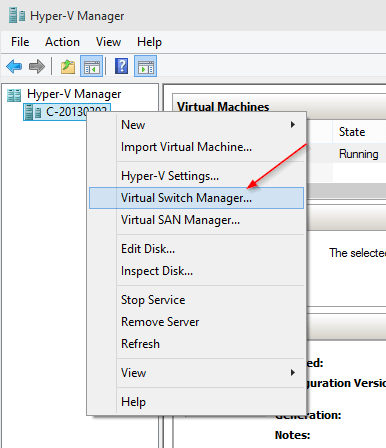
Select one of 3 types of a virtual switch, and click Create Virtual Switch button.
- External – if a virtual machine needs to get access to a physical network directly.
- Internal – if no need to get access to the physical network.
- Private – if a virtual machine only runs on this host.
You can configure Hyper-V settings on this particular host to specify the default folder to store virtual disks and virtual machine configuration files.
Once that’s all done, you can now import an existing VM or Create a brand new VM, and enjoy running a second OS in Hyper-V on your Windows 10 computer. I’ll help you to create a new virtual machine.
How to Create & Install New Virtual Machine in Hyper-V Manager
Creating a New Virtual Machine is easy, but it has lots of steps to follow. In order to provide better documentation, I’m attaching a video tutorial that shows you – How to Create/Install a New Virtual Machine.
The Creator is Installing Windows Server 2016 as a VM. You can choose your own. Installation of a New VM starts at 2:15.
Installing an Operating System on a Virtual Machine using Windows 10’s inbuilt Hyper-V feature is as easy as doing it in other VM programs like VirtualBox or Oracle VMware.
The best thing about this is, you don’t need to install any kind of third-party software and also it’s free.
Additionally, being a native app in the OS, I believe it provides – performance, enhancements as well as other features which are not available in third-party softwares.
If you correctly follow this short tutorial then you’ll be able to enable and install hyper-V on windows 10 pc.
I hope this tutorial helps you to easily install hyper-v on windows 10. If you find something difficult in the process, then come back here and let me know the problem, I’ll try my best to help you out.
Here, you can check out more useful guides and resources:
- How to take Backup + Reset your Cox Password
- What is Vulkan Run time Libraries and Do we need it?
- Best Microsoft Active Directory Alternatives
- How to Repair Windows 10 Registry
- 21+ Awesome Windows 10 Tips and Tricks
Here are a few more…